Home Guitar Store Work Bench Archive Bio/Contact/Links
![]()
Home
Guitar Store
Work
Bench Archive
Bio/Contact/Links
![]()
|
|
|
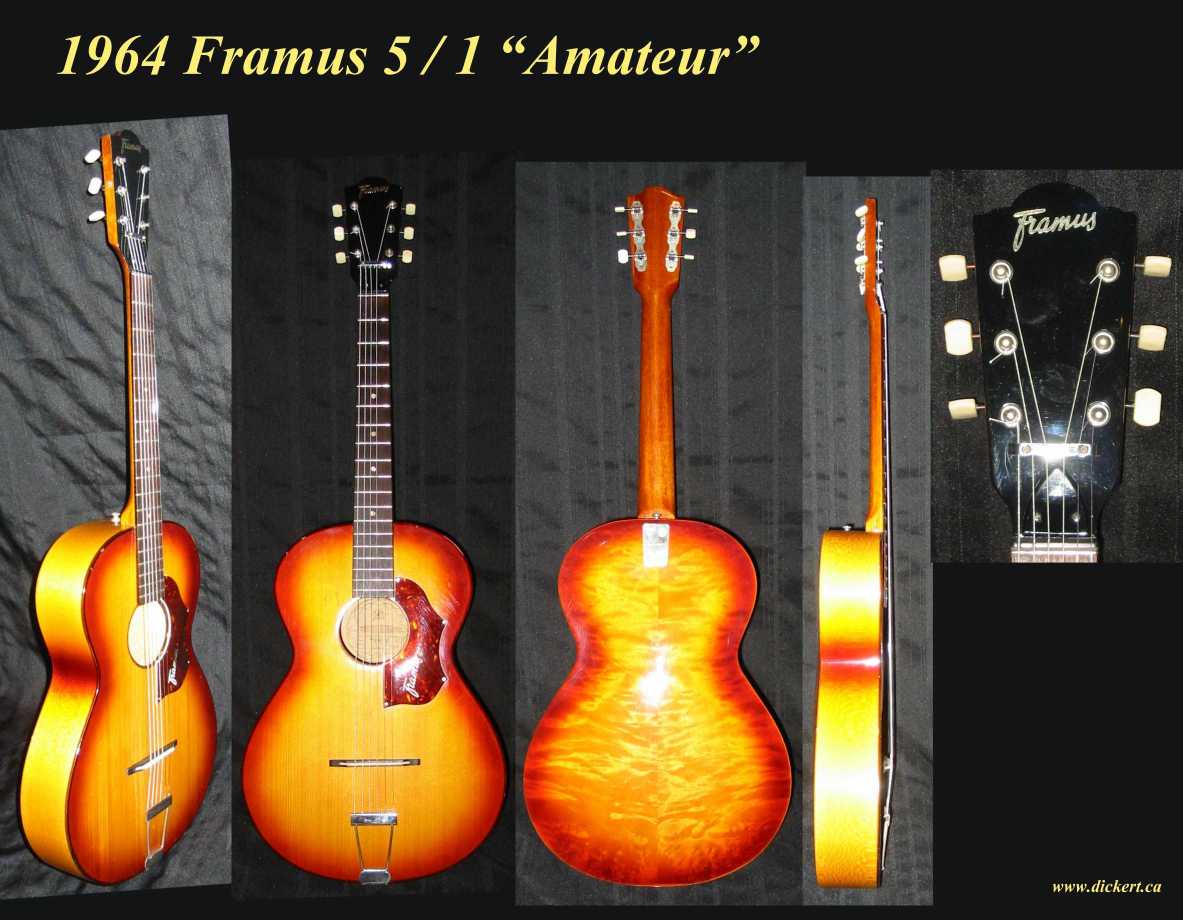
The rescue of a 1964 Framus 5 / 1 “Amateur” Acoustic GuitarIt was a sad fifty-year-old guitar, loaded with spider webs, dust, grime, and rust. Sitting up on top of some old tires in the garage for some 20 years. Strings – one missing – in the stratosphere. It looked destined for the dump. Kevin asked me to take a look at it. Can anything be done with this? WOW. What an unusual little guitar! A “Framus”. Framus was a mid sized West German instrument manufacturer that existed from 1946 to bankruptcy in 1975. This guitar is an example of their entry level instruments. An interesting mix of design elements including those that helped keep the cost down, but still a nice box overall. |
|
|
|
|
The list of weirdness go like this:
The rescue… I removed everything, tuners, trapeze, and everything, including taking the neck off. Got out the Meguiars automotive polish, both heavy and fine cut compounds and started working through the grime and oxidization of the guitars surface. I was pleasantly surprised to find very few dings. The polish also removed a lot of the scratches. The body and neck came up gleaming. So – WOW! A promising start. All the chrome parts had a lot of grime, and a film of rust. 1500 grit water paper and metal polish cleaned that. The tuners were stiff, but a bit of oil solved that problem, and they were still in good shape mechanically with little lash. The neck pocket was a big problem. As I said in the opening, the “strings where in the stratosphere”. The down and dirty way to fix that is to fold up some paper to be used as a shim, sitting it at one end of the pocket, under the neck changing the angle, thus bringing the strings into a better playing position, (the action). The problem with that is a lack of wood to wood contact along the pocket thus loosing sound through the instrument, and tone over all. The better way to do this is to make a wooden wedge, also from a repair mans point of view, if you mess up, you get to try it again. However, the best repair is to actually get in there with the chisel and cut a new sloped bottom to the neck pocket. I crossed my fingers and went to work. I cut out very small amounts of wood at a time, progressing very slowly as to not over-shoot the new angle needed. Even though it took a long time to do, it was still a lot easier than doing this kind of job on a traditional neck joint. The floating bridge was made of some nondescript wood dyed black, but the black was fading. I used Indian ink and re-blacked the bridge. The original non-compensated saddle was cheap plastic, with deeply worn slots (there should not be any slots on the saddle) throwing out the intonation even further. I made a new bone saddle with compensated string contact points. That represented two upgrades right there. Making the bone saddle involves carving a bone "blank" with files and sandpaper, to simultaneously set both action and compensation, effecting playability and intonation. Finally polishing to a shine with 1500 grit sandpaper making it look like jewelry. This is high end guitar stuff. The original Famus logo was made of a copper/gold coloured metal foil but was pealing off the headstock, and also had bad creases and folds. I tried gluing it back down but that didn’t work out very well. I put the guitar back together. The neck relief was actually set very nicely, the action was now good, and the floating bridge was easy to move to the proper intonation position. Since there was a zero fret, there was nothing to do at that end of the guitar. I installed new Silk and Steel strings. These have less pull than normal steel strings. This was done to help keep load off this lightly built guitar. As I started playing, I could hardly keep myself from inadvertently pulling the high E string off the side of the neck. It turned out the string spacing was not set correctly at the factory, with the high E way too close to the side of the neck. I’d noticed this earlier but hoped that it would not be too bad. No such luck. The guitar needed a new nut. Two strikes against… I got on line and finally found someone in Germany marketing replacement logos. I also pulled a graphite nut from my stash. Once receiving the logo in the mail, I removed all the gear from the headstock again, pulled the remnants of the old logo off, had to sand, repaint, then apply the new logo, and refinish with spray lacquer, making the headstock look almost factory new. The new graphite nut was also an upgrade to the guitar, since it is a much better tone propagating medium than the old plastic version. The string spacing is now set properly form the edges of the neck, and also to account for varying string thickness maintaining even spacing between strings. The depth of each slot is set to have positive pressure on the zero fret as well as the bottom of the slot increasing tone. Note, this item was custom hand shaped, slotted, and polished by me specifically for this guitar, from a generic Nut "blank" . Inspecting the condition of the frets revealed a bit of ware but well short of requiring a fret leveling and dressing, so I simply gave them a polishing removing the last DNA still hanging out on the guitar. A treatment of lemon oil on the fret board for both cleaning and conditioning, competed the work. Putting new string back on the guitar revealed a wonderful little instrument with a clear even tone across all string, plenty of volume considering the small box, and great playability. I’ve since had a number of player try out this guitar, and all quickly got a big smile on their faces while giving it a go. This guitar is small is size, big in character! I should have taken some “before” pictures. As you can see from the “after” pictures, it’s a cool looking little box. When you play it, it quickly gives you a feel and a tone all it’s own. Kevin, I hope you have your guitar lessons set up.
Ready for the next 50 years. |
|
|
|
|
